12 KiB
WANFi Software Quick Installation Guide
Preparation
- Hardware Requirements
CPU:    >= 4 core
Memory: >= 16GiB
Storage:
    OS:     >= 50GiB
    /opt/wfc:   >= 50GiB   # work and database storage
    /var/lib/docker: >= 50GiB
- System Environment
Linux >= Ubuntu 22.04
JDK >= 1.8 (Recommended version 1.8) (for Omada SDN Controller)
Omada SDN Controller > 5.15.6.7
docker >= 24.0.7, build 24.0.7-0ubuntu2~22.04.1
docker-compose >= v2.10.0
docker-buildx >= 0.14.1
- Install docker, docker-compose and buildx plugin
    sudo apt-get update
    sudo apt-get install -y docker.io

    # Install the docker-compose-v2 plugin
    sudo apt-get install -y docker-compose-v2
    sudo ln -s /usr/libexec/docker/cli-plugins/docker-compose /usr/bin/docker-compose

    # Install the docker-buildx plugin
    sudo apt-get install -y docker-buildx
    sudo ln -s /usr/libexec/docker/cli-plugins/docker-buildx /usr/bin/docker-buildx
- Please confirm that the versions of docker, docker-compose and docker-buildx plugin meet the requirements
    docker -v
    docker compose version
    docker buildx version
Obtaining the Installation Package
- TAR Installation Package
File name: wfc-1.0.7-20250221.tar.gz
- DEB Installation Package
File name:wfc-1.0.7-20250221.deb
Notes:
- Version: 1.0.7
- Build date:20250221
Obtain the latest version of the software installation package as needed
Installing and Configuring the Software
TAR Package Installation Method
- Create Installation Directory
This step is required for fresh installations. If upgrading, retain the existing directory
sudo mkdir /opt/wfc
- Extract the Software Package to the Installation Directory
sudo tar xvfz wfc-1.0.7-20250221.tar.gz -C /opt/wfc
DEB Package Installation Method
- Install the Software Package
sudo dpkg -i wfc-1.0.7-20250221.deb
- Directory Tree After Installation
/opt/wfc                    # work root directory
├── bin                     # shell script and binary file
├── docker                  # docker compose work directory
│   ├── env                 # default docker environment file, will be copy to docker compose work directory
│   ├── java                # java image directory
│   ├── mysql               # mysql database container directory
│   │   ├── conf
│   │   ├── conf.d
│   │   ├── data
│   │   ├── db
│   │   ├── logs
│   │   └── tmp
│   ├── nacos               # nacos container directory
│   │   ├── conf
│   │   └── logs
│   ├── nginx               # nginx container directory
│   │   ├── conf
│   │   ├── conf.d
│   │   ├── html
│   │   │   └── dist
│   │   │       ├── sys     # system portal
│   │   │       └── u       # user portal
│   │   └── logs
│   ├── redis               # redis container directroy
│   │   ├── conf
│   │   └── data
│   └── wfc                 # wfc container root directory
│       ├── auth            # auth root directory
│       │   └── jar
│       ├── gateway         # gateway root directory
│       │   └── jar
│       ├── modules         # modules root directory
│       │   ├── file
│       │   │   └── jar
│       │   ├── gen
│       │   │   └── jar
│       │   ├── job
│       │   │   └── jar
│       │   ├── payment
│       │   │   └── jar
│       │   ├── system
│       │   │   └── jar
│       │   └── user
│       │       └── jar
│       ├── upload          # file upload directory
│       └── visual
│           └── monitor
│               └── jar
└── systemd                 # service daemon file,will be copy to /etc/systemd/system
    └── system
- Configure the Software Environment
    cd /opt/wfc/bin
    sudo ./wfcsetup.sh env 192.168.13.128   # Parameter 2 is the host machine IP address
- Modify Docker Environment Parameters
Modify the following environment parameter configurations according to actual conditions: ** WFC_SERVER_IP address has already been replaced in the above configuration process ** Replace TZ with the host machine system time zone
    cd /opt/wfc/docker
    cat .env
        WFC_CONFIG_DATABASE=wfc_config_db
        WFC_SYSTEM_DATABASE=wfc_system_db
        WFC_USER_DATABASE=wfc_user_db
        MYSQL_SERVICE_NAME=wfc-mysql
        MYSQL_SERVICE_PORT=3306
        MYSQL_ROOT_PASSWORD=123456
        MYSQL_SERVICE_USER=root
        MYSQL_SERVICE_PASSWORD=123456
        REDIS_PORT=6379
        NACOS_PROFILE_NAME=prod
        NACOS_NAME_SPACE=wfc-prod
        NACOS_SERVER_NAME=wfc-nacos
        WFC_SERVER_PORT=80
        NACOS_SERVER_PORT=8848
        GATEWAY_SERVER_PORT=8080
        AUTH_SERVER_PORT=8081
        WFC_FILE_PORT=9201
        WFC_JOB_PORT=9203
        WFC_PAYMENT_PORT=9204
        WFC_SYSTEM_PORT=9205
        WFC_USER_PORT=9206
        WFC_SERVER_IP=192.168.13.128
        NACOS_SERVER_IP=${WFC_SERVER_IP}
        GATEWAY_SERVER_IP=${WFC_SERVER_IP}
        RESTART_OPTION=on-failure:5
        TZ=Asia/Shanghai                             #docker container time zone
If these container environment parameters have not been changed, you can directly run the following command to set the environment and create containers:
    cd /opt/wfc/bin
    sudo ./wfcsetup.sh all 192.168.13.128   # Parameter 2 is the host machine IP address
- Create Docker Containers
If you have already run 'sudo ./wfcsetup.sh all 192.168.13.128', the following command can be omitted
    cd /opt/wfc/bin
    sudo ./wfcsetup.sh all
Configure Omada Platform Integration Connection Parameters
- Obtain portal platform integration connection parameters from the Omada service, as shown below:

Note: The connection MODE uses Client. For specific configuration methods, refer to the relevant Omada documentation
-
Modify Configuration Files
- Modify the following Omada configuration items for platform integration with Omada
cd /opt/wfc/docker/conf cat application-common.yml ... # Omada config omada: # web url or host exp: 'https://192.168.2.249:8043' omada-url: 'https://aps1-omada-northbound.tplinkcloud.com' omadac-id: 'c4decbf73f80094019d664506ec9b4d4' client-id: '6110a77822234243a033e652d1e8a3ae' client-secret: '651957da95f14f45b719876bb68bd6f5' ...- Modify the following email configuration items for sending email verification codes
cd /opt/wfc/docker/conf cat application-common.yml ... mail: enabled: true host: mail.agrandtech.com port: 25 # Enable authentication auth: true # Sender, follows RFC-822 standard from: smtpext <smtpext@agrandtech.com> # User name user: smtpext # Password pass: Smtp123@agt # Use TLS security connection starttlsEnable: false # Use SSL security connection sslEnable: false # Timeout value for sending mail, in milliseconds timeout: 0 # Connection timeout value, in milliseconds connectionTimeout: 0 ...-
Allow email-related domains in Omada
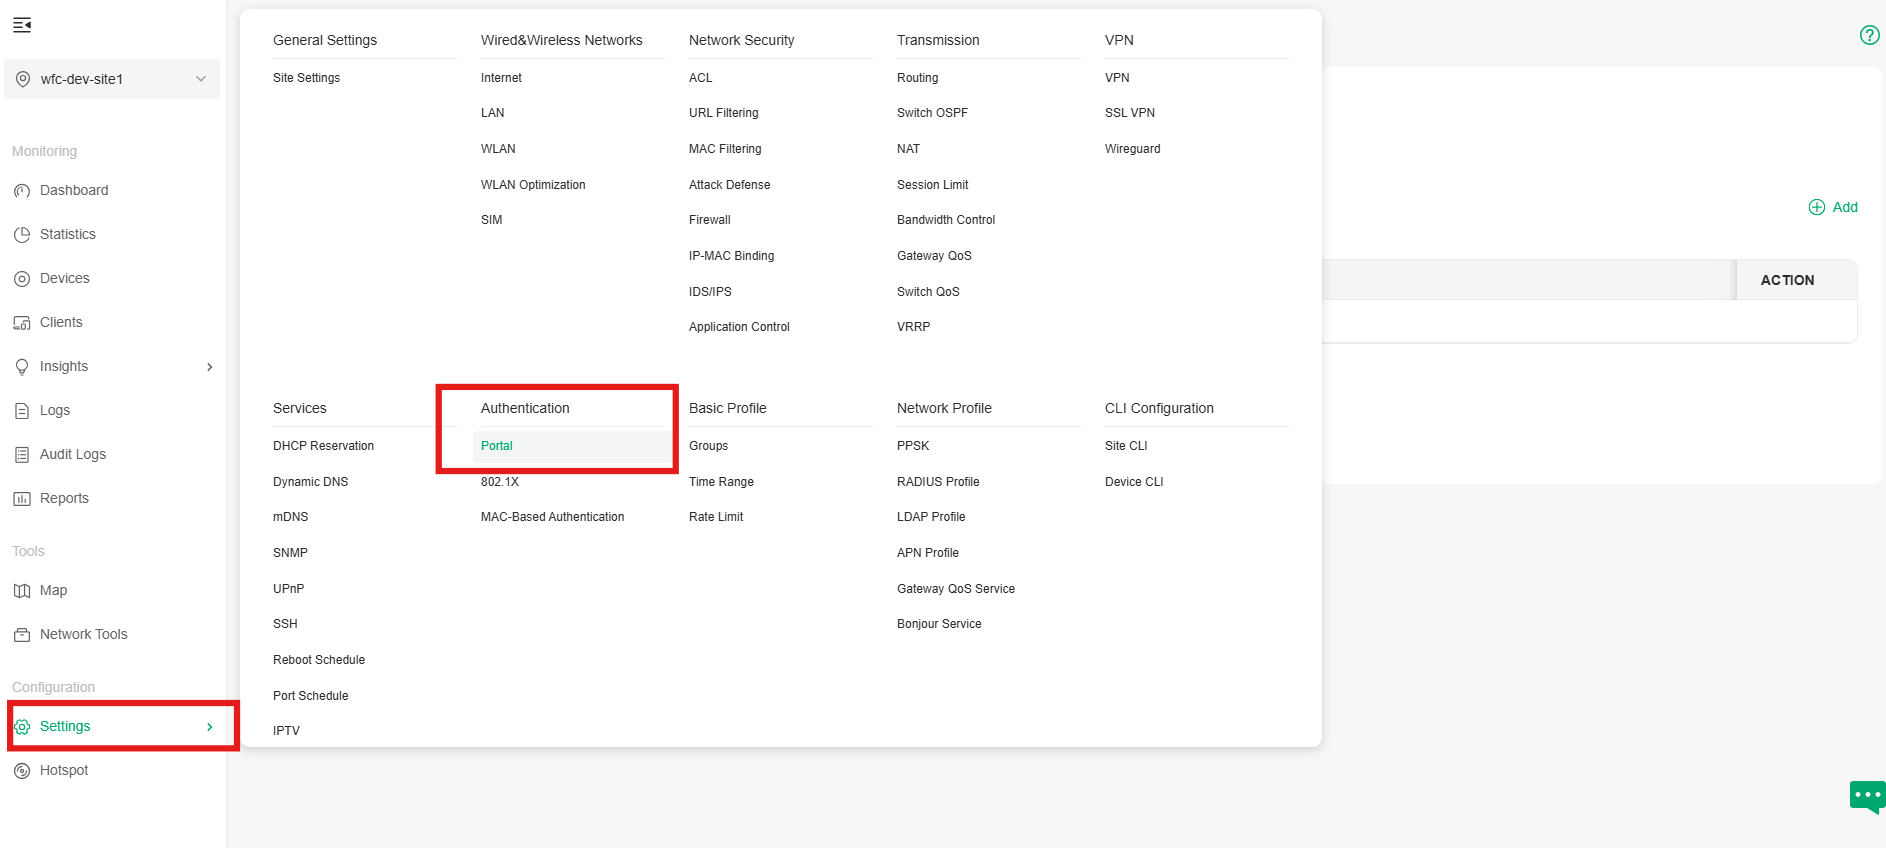
To support users in obtaining email verification codes without network permissions when logging into AP for the first time, you can allow email-related domains in Omada. The specific steps are as follows:
After entering Omada, select the site you need to configure, select Settings->Authentication->Portal->Access Control->Pre-Authentication Access->check Enable, then add the email-related domains to the Pre-Authentication Access List. Note that all domains involved in accessing email need to be allowed, as shown in the following figures (the allowed domains may not be complete):

-
Modify payment configuration items
cd /opt/wfc/docker/wfc/modules/payment/conf/ cat application.yml ... # payment configuration, # alipay configuration alipay: appId: 9021000122699258 privateKey: MIIEvwIBADANBgkqhkiG9w0BAQEFAASCBKkwggSlAgEAAoIBAQC7YAcIXV5GJlTWBOoBcrVG1zKxHunznSjYXwTS2DM3YgloxzKye4apfcmBDVnoL93m4QrJTtbiHYvu4yJjJfJsQEY+Wo44IczhDypyu+Il6JpQOwylTs94/+3aaQ1wThsDaGs8edaFGteuw+1pUVl4nxF00fS1VoIR30riqAGFAXrPhcSA6Y9c8HK1htxCelICnPzjpqC4s8ZjrjS7FoyHP2ZAay5fx1VEtah30E4RvycFfV/i2+k3JGFOSeevdCx6Ufu+9Y/RaG4Sh84QuYRQUhAHUswlFDHpRrAnxHzt0zDkOkg3BrCT7vMtBbSOP9BdIhpVTaZm4diQdNbLSl4hAgMBAAECggEAKb1Xc7aQ1KGfTlmj4xSxawlvImOXjAwbWC+6fFlq91BgdjXBhl7b/Y+mvpfBymY3UUIaTAPC/HXGgT2ZoGqImTKsMyGrArgM0qm1M//EfdtV3L96rqxirTqduoSiWL0daWHuWXduoRH8r9K3ZTmY67TLh7FpiKevq9mI7fqs8/qgq5QAN4UPFb3Cq9hDNTU4l6+Bywdg1KkwJ2Jc98SlrIdVl+1eCMAgueLR0aNHTobyPBZ/KfwGRV0OQ3QqjLVgL3zlbzuylYhaZqPgxxd46vgWwkyMiiv7u2OyCetq4LFd+tcNDz0Yqk6rK9/S0oxbN8NM5DLkpwFh/433BoPS3QKBgQD/dsxNr2PYdPLp6pOvw7H2AFMH8CkwTlRg+2f/0fgQF14rJwZgEU6fL5A2JvQeRRC5mCff2m5tDqrS321JNyH/JIKJ+4J8I34GEo/kSCHL3RmyvJGQOQ/EpEyxvP8BV3ob6UO3LR58DOGlJr8eTsr3Y8o9cAMuknCNxvsd2LvybwKBgQC7xKkx4KIPBny6sCOtChOkgIrY3hOCi+ZsHQVESXKzeku0NkH/qrAG+S9pb1XCzXdM2HrzkMeuz6tqi+2TY8nORyY2DZHNW7FqzkAiZ/NO2AgGIlALq1ZfJZke2MxgtBnxSsQ03gfXP9opu/FsLH9a+s6edfHPvKD4kHxlLBfAbwKBgQDYvr6QmuKn4HHJLZGoau0uvw+ziHwp1AubTTLrxgYmAO2Qx0eNcqG2RfChQWOV2xtZnFMYhodyWCNvTsm2eOSLSTrIP3ByStq95DnZganLAgivsXX/W6qZOJ0poCTryoB79enSHKHktjksmjdFS6zBQRVyEvtgJDcC03Rz2lN8WQKBgQCCoJE4otb7bv7s/ccEBeOeaNKvhue5xUwbYKEeXZ6PYAA0sh5+GCf34flq90qJiFl7u4rl0Y4pfk35hLlV9XEasYLSzePmIuktrakOhpTNABus8MgRJjSjYsvAmwCsMf9uTx5qzSBVThWfPSH6qIY9LAj8Un9UjxzJb/Mqi19GvwKBgQC0/KB+3robTqy9KOV4iEKJ4kmnXDRu7ecpMyc8k5HzpolIHcXLZHkBK9pMCXBQ9Kwy6BjRGNnUZOahS+tvnMcjHpwdhu90r7D51GXW/+PeFtphYTscFhHv1yuWbbojzhKf69pZnsVmyllIBqRgtbkS2WNHxWo/peCg47TcLaQNMA== publicKey: MIIBIjANBgkqhkiG9w0BAQEFAAOCAQ8AMIIBCgKCAQEAhBZoE6p1TKpd/WsAJRTA2D6yUTzqLmZ73scxbPxxKwPIg2ys2Ap21u/lVmqBWO9Wf2Z7wUwr/6BP1PQqVpg0GAqU3yjjZ0LGfBitzMBMbGrlOLqJQ3PKgnUNmnOdLR4FlHCAjKtuyxjHkxBTHg/L4punk4lkFJQD8YvzFrYalS6WYw5j1/oq080NbcjPirPCRlsU7MRraQuUqSTdPwm2iHkroKwCEbGv+RtNJCfOkKNQVtRFFgPGMhU4nQ620gdfzsGJsNFKVJnD5SjeDWniBAbaGaVF4rEfKJPe6+XrcMg3h+9Fz+A2IU1KCCoth2neEZEaU1t0KBGxXIuo4efi/QIDAQAB appCertPath: \u5E94\u7528\u516C\u94A5\u8BC1\u4E66 aliPayCertPath: \u652F\u4ED8\u5B9D\u516C\u94A5\u8BC1\u4E66 aliPayRootCertPath: \u652F\u4ED8\u5B9D\u6839\u8BC1\u4E66 serverUrl: https://openapi-sandbox.dl.alipaydev.com/gateway.do domain: http://192.168.2.249 testDomain: http://129.204.171.210:8085 # wxpay configuration wxpay: appId: appSecret: mchId: partnerKey: certPath: domain: http://192.168.2.249/u ...-
Allow payment-related domains in Omada
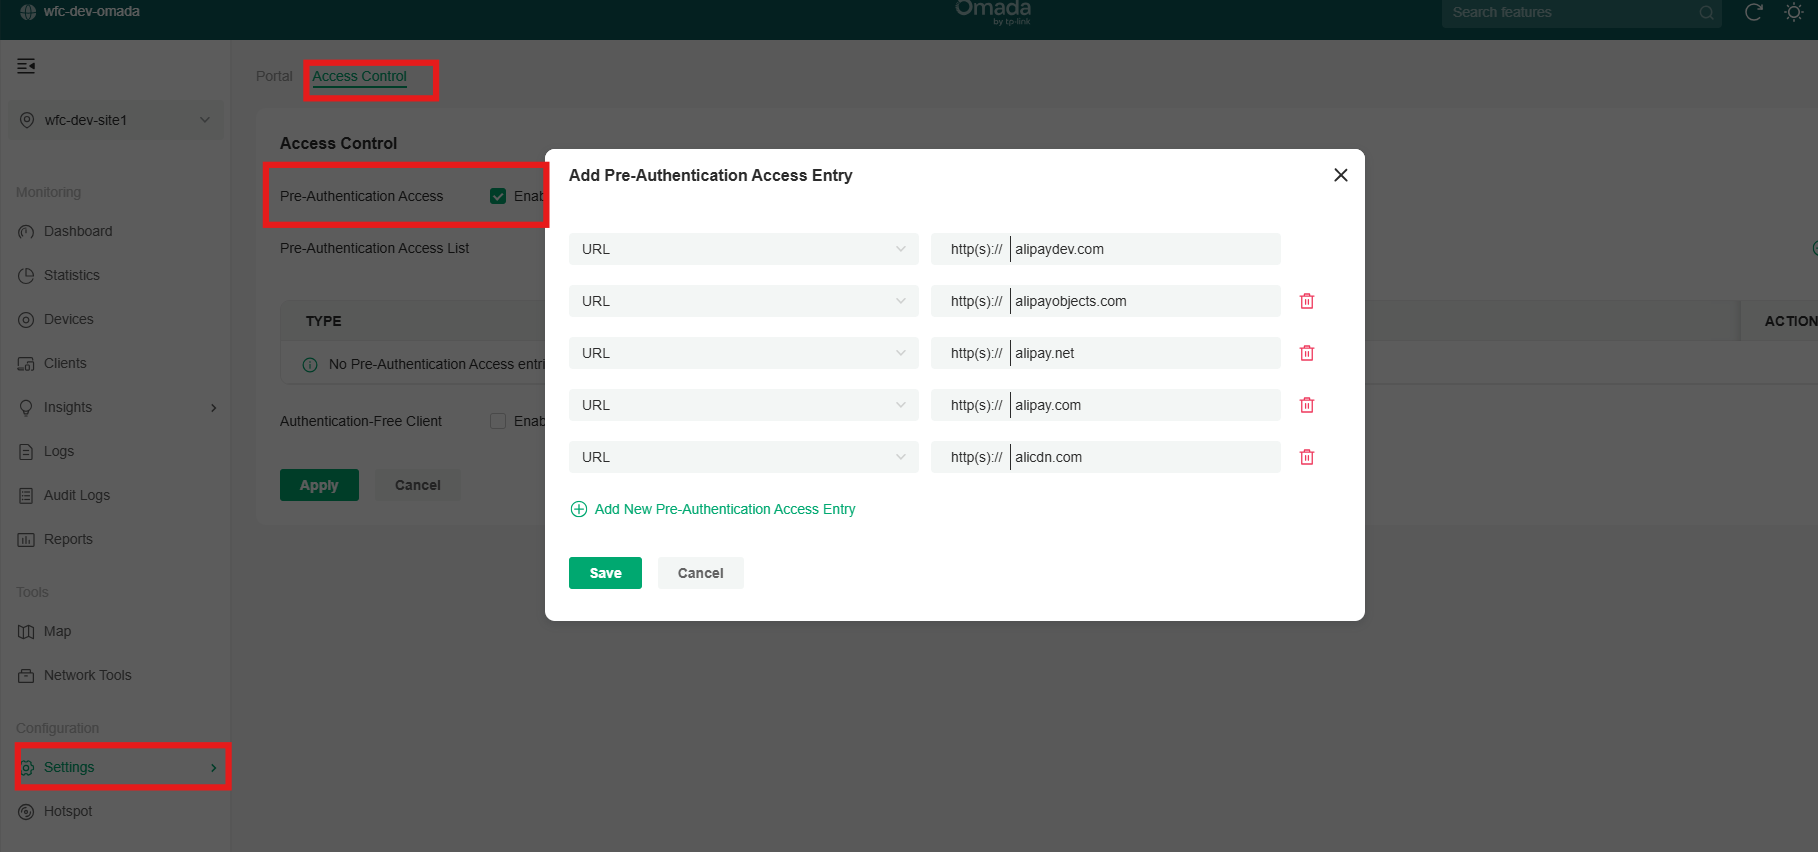
To support users in normally completing package purchases or balance recharges without network permissions when logging into AP for the first time, you need to allow payment-related domains in Omada. The specific steps are as follows:
After entering Omada, select the site you need to configure, select Settings->Authentication->Portal->Access Control->Pre-Authentication Access->check Enable, then add the payment method-related domains to the Pre-Authentication Access List. Note that all domains involved in payment need to be allowed, as shown in the following figures (the allowed domains may not be complete):
-
Start/View/Stop/Version Software


    cd /opt/wfc/bin
    sudo ./wfccontrol.sh start/restart/status/stop/version
Access System Platform and User Platform via Browser
- System Platform Portal Address:
http://192.168.13.128/sys
- User Platform Portal Address:
http://192.168.13.128/u